Graphic design process: essential steps and best practices
December 2024
11 mins

Table of contents
Just add LucidLink
No barriers to entry. Nothing new to learn. Known and familiar user interfaces that you choose for your team.
Start your free trialGraphic design is everywhere — from the logo on your clothes to the page you’re reading now.
Graphic design — which encompasses branding, marketing, packaging, print and digital media, motion graphics, environmental design, typography and more — was a $52.6 billion industry last year, used by some 81% of businesses. From marketing to product to internal communications, graphic design is used in pretty much every department of a modern business.
Fortunately, good design is a process you can refine and repeat. Whether you’re looking to improve your team’s workflow, or streamline your freelance projects, this guide will help you perfect the graphic design process.
What is the graphic design process?
Graphic design uses visual elements — like typography, imagery and layout — to communicate messages effectively. It spans disciplines as varied as:
Branding (including logos, color schemes and font choices)
Marketing and advertising collateral (like social media posts or posters)
Packaging
Print and digital media (magazines, books, websites, emails)
Motion graphics (like explainer videos or title sequences)
Environmental design (like signs or exhibition booths)
Murals and infographics
Software and app user interfaces
And a whole lot more.
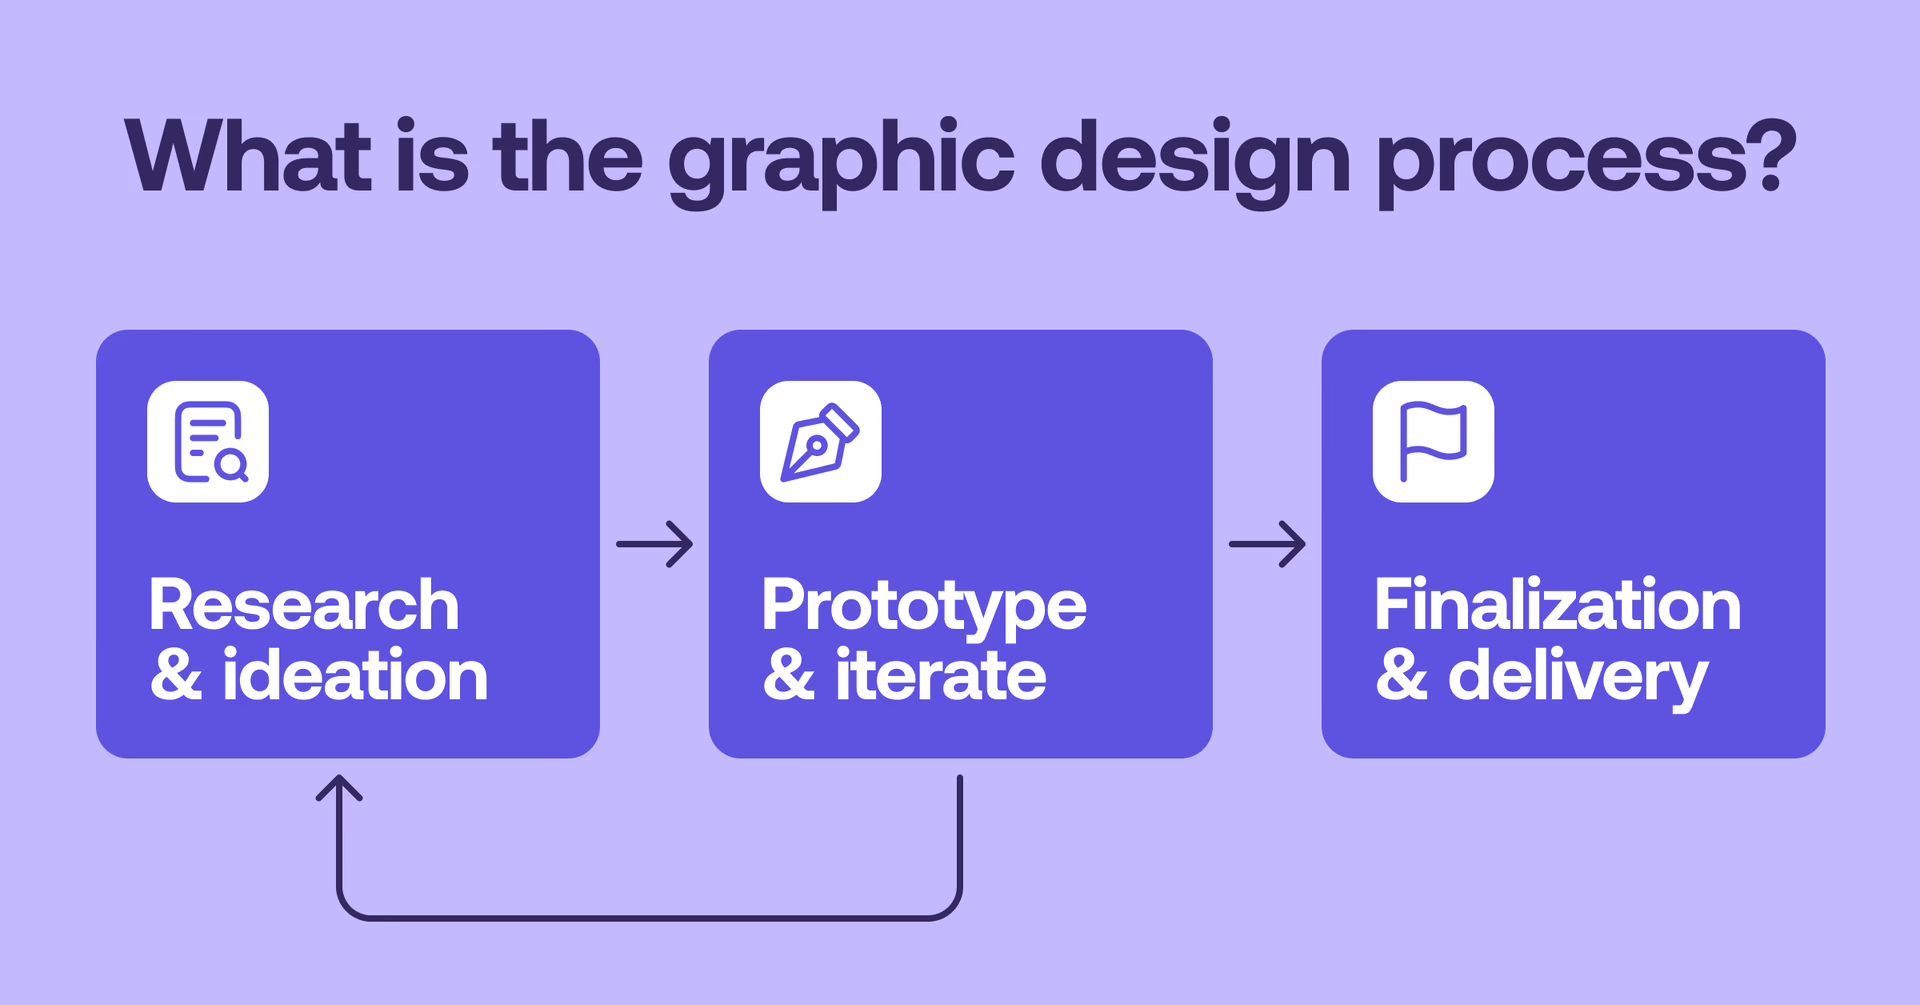
The graphic design process guides your projects from idea to execution. It starts with uncovering the client’s goals and researching how best to bring them to life.
Designers then prototype, refine and iterate until the final vision takes shape, incorporating feedback from stakeholders, clients and sometimes users themselves.
Benefits of an organized graphic design process
Why is creating and managing a codified graphic design workflow worth the effort? The benefits include:
Better alignment. Defining goals early ensures everyone’s on the same page, while regular check-ins keep progress on track.
Staying on track. If you’ve clarified the project’s deliverables upfront and follow a replicable format, you can properly quote the client in terms of cost and timeline.
Better quality control. A replicable process can help give creatives the time, materials and information they need to produce great work.
Future-proofing for scale. You can brace yourself for an influx of work by creating processes that kick into gear as necessary with minimum fuss.
Happier clients. Your clients and colleagues will appreciate your organization, communication and commitment to quality.
How LucidLink helps streamline the graphic design process
Waiting around for files to download or fussing with version management can disrupt the graphic design process. That's where LucidLink can help.

LucidLink provides design storage collaboration that lets distributed teams work as if they’re sharing a hard drive. That means files of any size can be shared with colleagues anywhere in the world — instantly.
This is a game-changer on graphic design projects with lots of large files which need to be accessed and iterated upon by team members quickly. The benefits of using storage collaboration include:
Instant access for your team: share files instantly with anyone who needs them
Complete organization: keep all files centralized and organized across your team
Version control, solved: rest easy knowing everyone’s hard drive always has the latest version of every file
Super secure: zero-knowledge encryption and access controls means that confidential files stay that way
Optimized for remote teams: assemble your crew from anywhere in the world
Fits any tech stack: no matter what tools you’re using, LucidLink fits right in
Infinitely scalable: the sky’s the limit when you have infinite storage
Want to see how LucidLink can transform your design workflow? Sign up for a free trial today.
5 steps of the graphic design process

The graphic design process steps aren’t too different from any other conventional examples of design thinking, including software and UX design.
The process should center on people’s needs and take an iterative approach to solving their problems using creativity and empathy. What does this look like? Well, let’s dig in.
1. Design a brief
A good brief is the cornerstone of a successful graphic design process. The document itself can be used and referred to throughout the ensuing project.
But more than that, going through the steps of making the brief nudges everyone involved to ask the right questions and ensure the right people are keyed into the project.
The brief might be made by an account or strategy person in an agency; it could be made by a project manager for an internal initiative; it could be made by the designer themselves if they’re a freelancer. It should include key details, such as:
Core objectives
The overarching goals of the project
Key measurable benefits (such as “increase traffic 10X%”)
The target audience (demographics, pain points, psychographics)
The problem to be solved through the requested designs
Deliverables and details
The high-level deliverables (such as a new logo) as well as deliverable specifications (including file formats, resolutions and requested variants)
Timeline and deadlines for drafts and revisions
Budget constraints
Non-negotiables: specifics from the client that must be included, such as color schemes, disclaimers or legal callouts
A list of stakeholders and guidelines for delivering feedback
Style and tone
All of the above helps set up the rules and restrictions by which the work must be completed. Additionally, the brief may contain some “softer” guidelines, including:
Style preferences
Tone and messaging, including “feel” for the audience
Client preferences on delivery
Taboos and dislikes
Supporting context
Lastly, briefs can often contain contextual information or links to information that the client may already have that could be useful, such as:
The competitive landscape
The client’s brand identity, mission or values
Broader branding assets
Previous related work (earlier design iterations, for example)
Countless templates out there will claim to be the perfect brief for every situation, or to simplify the process into the five essential items.
Any of these can be a fine starting point. But the best brief is the one that works for your situation, and is likely a little adaptable based on the client, the team and the project itself.
Once the brief is ready, use it as the foundational document for a kickoff meeting with the team working on the project.
This is a great moment to ask questions and clarify any areas of confusion. If all of these materials are stored in a shared filespace on LucidLink, all stakeholders will have access to everything immediately — forming a repository that can be built on as the project proceeds.
2. Conduct research
Great graphic design doesn’t come straight from the brief, though. Flesh out your understanding of the project’s possibilities with additional desk research. (This can be built into the workflow, depending on the timeline.) Areas to investigate include:
Broader norms, challenges and trends within the marketplace
Competitors’ branding and visual styles
“Gap analysis” determining where you can stand out in the market
Deeper understanding of target audience, through in-person interviews or surveys
Behaviors on specific target platforms, such as TikTok or LinkedIn
Visual inspiration from design platforms like Pinterest or Behance
User perception of the brand, including reviews and social commentary
Legal considerations and technical specifications
Lots of free tools (or free trials for paid tools) can get you started on some of these areas of inquiry: Google analytics, HubSpot, Typeform (if you wanted to create surveys), Trendhunter, SEMrush and so on.
Another great way to conduct research is to arrange an interview with the client. Do this after comparing any desk research with the materials already provided in the brief. Multiple interviews with multiple stakeholders can help you find areas where people agree or disagree.
Another possible step at this point is to compile inspirations into a moodboard in order to start getting loose reactions from people on the team. That moodboard might even be a folder on a LucidLink filespace so all your collaborators have visibility, wherever they’re working.
This moodboard acts as a baby step toward the next phase, when you finally start working on the designs.
3. Create and iterate

These two steps are combined because they should go back and forth. How many times? Well, that’s up to you and your team.
Consider all of the steps listed below as variations on a theme, where that theme is designing and soliciting feedback.
If all you’re doing is mocking up a social media post for a partner you’ve worked with before, this step may be as simple as designing that post and then shipping it to them.
On the other hand, if it’s a full brand overhaul for a major company, it likely hits every step mentioned below (and then some). We’ll go over some of the major phases of creation for you to choose from.
Brainstorm
Start by brainstorming wild ideas based on the brief and research. This is the best place for “no bad ideas” thinking — just mock up ideas wildly to see what works and what has potential with a little reworking.
Try a wide range of colors, layouts and styles, ask for feedback from bystanders, and, when possible, let an idea marinate overnight to see if you still like it the next day. Any creative knows the risk of falling in love with an idea in the moment only to see its flaws more keenly after a little rest.
Start sketching
You may have been sketching throughout the brainstorm phase, but now it can begin in earnest. This may take place with pen and paper or tablet and stylus. If you’re redesigning a website, this could be wireframing.
But the basic idea is that at this point you’re starting to find shapes and arrangements that may make it into the final project. One good rule of thumb is to make 3-5 decently varied concepts at this point before moving to digital tools.
Start getting feedback and iterating
Trusted peers, collaborators, test audiences and project leads are all great places to get feedback as you go.
You may have begun doing this as early as the brainstorm phase, but once you’re narrowing down ideas, you definitely want to seek constructive feedback. If you’re getting recurring suggestions or criticisms, those are worth listening to and addressing.
You can even give guidelines to people for feedback. Request feedback that is:
Clear and specific. Providing prompts (“does the color scheme convey the right mood?”) is a great start.
Tied to project goals. Providing the brief or a reminder can help.
Constructive. You want feedback-givers to be clear about what they don’t like, but you also want them to be specific, without necessarily prescribing a solution. People’s intuitions about problems are normally correct, but the solutions should come from you.
User-centered. When possible, try to keep the needs of the actual end users in mind.
LucidLink can serve as media cloud storage for the entire project. All of your materials can be shared in one “review” folder so stakeholders have instant access — no matter how many files or how big they are.
If possible, keep all of your revisions and early versions — you never know when you may have been onto something earlier in the project.
Prepare for finalization
It can be tempting to tinker forever, but deadlines exist for a reason. As it approaches, start fine-tuning elements to get ready for presentation.
Double-check that the file specifications are correct for the intended medium. Consider creating some variations of each deliverable, so the recipients will have flexibility and can consider the work from multiple angles.
4. Present the work

You’ve done the work — now it’s time to present it to the client, stakeholder or requester. On some projects, this may just be another interaction. The client’s feedback may be used to inform an entirely new round of work.
Even so, this is a more important iteration than usual, so you’ll want to take some special steps. If you’re presenting the work live — either online or in-person — you may want to place the work in a presentation featuring the client’s branding.
You can organize a narrative that introduces the project goals (conflict) before walking them through the journey to your work (the resolution). If this is branding work, you may want to create mock-ups of the logo on billboards or packaging. If it’s a UI or UX project, a clickable prototype can give a more tactile understanding of the work.
On the other hand, you may just be filing some social mock-ups to a partner you’ve worked with for years. You should still put some thought into how you let them know the work is completed and prepare yourself for any questions or revisions that may come your way after they review it.
5. Delivery, analysis and iteration

Finally, you’ll package up all the work in the requested formats and deliver them to the client. For LucidLink users, this is as simple as saying the finished collateral is in the shared filespace. Other workflows may involve sending large files in zipped bundles.
In many projects, though, work continues long after delivery.
A website redesign may involve ongoing analysis of key metrics to see how the new layout impacts them. A brand overhaul could involve ongoing analysis of social media mentions. Additional iterations may be built in based on this analysis.
No matter what, it’s good to at least check in to see if the graphic solutions worked as designed.
Did they solve the problems they were intended to solve? What metrics support or refute this?
At the very least, an after-the-fact post-mortem meeting can help solicit valuable feedback and ensure good working relationships with all involved.
Tips for optimizing your graphic design workflow
A great workflow can do wonders for your graphic design practice. Here are a few closing tips to consider:
Choose the right tools. Fortunately, we’ve already sorted through the best tools for design collaboration.
Consider whether AI is right for your practice. AI can speed up repetitive tasks like resizing assets or creating mock-ups. But it’s important to understand its limits and ensure the output matches your standards.
Try the 10/50/99 review policy. This means you’ll get feedback on your work when it’s 10% done (a sketch), 50% done (a first draft), and 99% done (almost ready for delivery).
Review your own workflow. A creative workflow needs to be maintained, which might mean scrapping old steps or adding in new ones periodically.
Stay organized. Keep files and folders organized and named using a consistent scheme.
Our last tip? Try out LucidLink. With centralized storage and instant access to files you can eliminate admin headaches and focus on the thing that matters most — great design.
Ready to streamline your graphic design process? Try LucidLink free today.
Keep reading

How the cloud fuels storytelling: 5 takeaways from top creatives
Hear how top creatives use the cloud to collaborate in real time, streamline workflows and stay ahead.
24 April 2025, 4 mins read

Marketing video production guide: how to stand out & get results in 2025
Discover expert strategies for marketing video production. Learn how to create standout videos that engage your audience and drive real ROI.
28 February 2025, 8 mins read
Remote video production: a step-by-step guide
Discover the challenges, steps and tools needed for remote video production. Get advice to create remarkable remote productions in our comprehensive guide.
14 February 2025, 10 mins read
Join our newsletter
Get all our latest news and creative tips
Want the details? Read our Privacy Policy. Not loving our emails?
Unsubscribe anytime or drop us a note at support@lucidlink.com.